If you are an AWS user with EC2 instances running, you may have already gotten an email from AWS informing you that your instance(s) will be rebooted in the near future. I'm not exactly sure what is prompting this massive rebooting binge but the good folks at AWS have actually provided a new EC2 API request just so you can find out about upcoming maintenance events planned for your instances.
We just committed code to boto that adds support for the new DescribeInstanceStatus request. Using this, you can programmatically query the status of any or all of your EC2 instances and find out if there is a reboot in their future and, if so, when to expect it.
Here's an example of using the new method and accessing the data returned by it.
Showing posts with label AWS. Show all posts
Showing posts with label AWS. Show all posts
Wednesday, December 7, 2011

Sunday, May 23, 2010
Boto and Google Storage
You probably noticed, in the blitz of announcements from the recent I/O conference that Google now has a storage service very similar to Amazon's S3 service. The Google Storage (GS) service provides a REST API that is compatible with many existing tools and libraries.
In addition to the API, Google also announced some tools to make it easier for people to get started using the Google Storage service. The main tool is called gsutil and it provides a command line interface to both Google Storage and S3. It allows you to reference files in GS or S3 or even on your file system using URL-style identifiers. You can then use these identifiers to copy content to/from the storage services and your local file system, between locations within a storage service or even between the services. Cool!
What was even cooler to me personally was that gsutil leverages boto for API-level communication with S3 and GS. In addition, Google engineers have extended boto with a higher-level abstraction of storage services that implements the URL-style identifiers. The command line tools are then built on top of this layer.
As an open source developer, it is very satisfying when other developers use your code to do something interesting and this is certainly no exception. In addition, I want to thank Mike Schwartz from Google for reaching out to me prior to the Google Storage session and giving me a heads up on what they were going to announce. Since that time Mike and I have been collaborating to try to figure out the best way to support the use of boto in the Google Storage utilities. For example, the storage abstraction layer developed by Google to extend boto is generally useful and could be extended to other storage services.
In summary, I view this as a very positive step in the boto project. I look forward to working with Google to make boto more useful for them and for the community of boto users. And as always, feedback from the boto community is not only welcome but essential.
In addition to the API, Google also announced some tools to make it easier for people to get started using the Google Storage service. The main tool is called gsutil and it provides a command line interface to both Google Storage and S3. It allows you to reference files in GS or S3 or even on your file system using URL-style identifiers. You can then use these identifiers to copy content to/from the storage services and your local file system, between locations within a storage service or even between the services. Cool!
What was even cooler to me personally was that gsutil leverages boto for API-level communication with S3 and GS. In addition, Google engineers have extended boto with a higher-level abstraction of storage services that implements the URL-style identifiers. The command line tools are then built on top of this layer.
As an open source developer, it is very satisfying when other developers use your code to do something interesting and this is certainly no exception. In addition, I want to thank Mike Schwartz from Google for reaching out to me prior to the Google Storage session and giving me a heads up on what they were going to announce. Since that time Mike and I have been collaborating to try to figure out the best way to support the use of boto in the Google Storage utilities. For example, the storage abstraction layer developed by Google to extend boto is generally useful and could be extended to other storage services.
In summary, I view this as a very positive step in the boto project. I look forward to working with Google to make boto more useful for them and for the community of boto users. And as always, feedback from the boto community is not only welcome but essential.
Monday, April 19, 2010
Subscribing an SQS queue to an SNS topic
The new Simple Notification Service from AWS offers a very simple and scalable publish/subscribe service for notifications. The basic idea behind SNS is simple. You can create a topic. Then, you can subscribe any number of subscribers to this topic. Finally, you can publish data to the topic and each subscriber will be notified about the new data that has been published.
Currently, the notification mechanism supports email, http(s) and SQS. The SQS support is attractive because it means you can subscribe an existing SQS queue to a topic in SNS and every time information is published to that topic, a new message will be posted to SQS. That allows you to easily persist the notifications so that they could be logged or further processed at a later time.
Subscribing via the email protocol is very straightforward. You just provide an email address and SNS will send an email message to the address each time information is published to the topic (actually there is a confirmation step that happens first, also via email). Subscribing via HTTP(s) is also easy, you just provide the URL you want SNS to use and then each time information is published to the topic, SNS will POST a JSON payload containing the new information to your URL.
Subscribing an SQS queue, however, is a bit trickier. First, you have to be able to construct the ARN (Amazon Resource Name) of the SQS queue. Secondly, after subscribing the queue you have to set the ACL policy of the queue to allow SNS to send messages to the queue.
To make it easier, I added a new convenience method in the boto SNS module called subscribe_sqs_queue. You pass it the ARN of the SNS topic and the boto Queue object representing the queue and it does all of the hard work for you. You would call the method like this:
>>> import boto
>>> sns = boto.connect_sns()
>>> sqs = boto.connect_sqs()
>>> queue = sqs.lookup('TestSNSNotification')
>>> resp = sns.create_topic('TestSQSTopic')
>>> print resp
{u'CreateTopicResponse': {u'CreateTopicResult': {u'TopicArn': u'arn:aws:sns:us-east-1:963068290131:TestSQSTopic'},
u'ResponseMetadata': {u'RequestId': u'1b0462af-4c24-11df-85e6-1f98aa81cd11'}}}
>>> sns.subscribe_sqs_queue('arn:aws:sns:us-east-1:963068290131:TestSQSTopic', queue)
That should be all you have to do to subscribe your SQS queue to an SNS topic. The basic operations performed are:
The actual policy looks like this:
{"Version": "2008-10-17", "Statement": [{"Resource": "arn:aws:sqs:us-east-1:963068290131:TestSNSNotification", "Effect": "Allow", "Sid": "ad279892-1597-46f8-922c-eb2b545a14a8", "Action": "SQS:SendMessage", "Condition": {"StringLike": {"aws:SourceArn": "arn:aws:sns:us-east-1:963068290131:TestSQSTopic"}}, "Principal": {"AWS": "*"}}]}
The new subscribe_sqs_queue method is available in the current SVN trunk. Check it out and let me know if you run into any problems or have any questions.
Currently, the notification mechanism supports email, http(s) and SQS. The SQS support is attractive because it means you can subscribe an existing SQS queue to a topic in SNS and every time information is published to that topic, a new message will be posted to SQS. That allows you to easily persist the notifications so that they could be logged or further processed at a later time.
Subscribing via the email protocol is very straightforward. You just provide an email address and SNS will send an email message to the address each time information is published to the topic (actually there is a confirmation step that happens first, also via email). Subscribing via HTTP(s) is also easy, you just provide the URL you want SNS to use and then each time information is published to the topic, SNS will POST a JSON payload containing the new information to your URL.
Subscribing an SQS queue, however, is a bit trickier. First, you have to be able to construct the ARN (Amazon Resource Name) of the SQS queue. Secondly, after subscribing the queue you have to set the ACL policy of the queue to allow SNS to send messages to the queue.
To make it easier, I added a new convenience method in the boto SNS module called subscribe_sqs_queue. You pass it the ARN of the SNS topic and the boto Queue object representing the queue and it does all of the hard work for you. You would call the method like this:
>>> import boto
>>> sns = boto.connect_sns()
>>> sqs = boto.connect_sqs()
>>> queue = sqs.lookup('TestSNSNotification')
>>> resp = sns.create_topic('TestSQSTopic')
>>> print resp
{u'CreateTopicResponse': {u'CreateTopicResult': {u'TopicArn': u'arn:aws:sns:us-east-1:963068290131:TestSQSTopic'},
u'ResponseMetadata': {u'RequestId': u'1b0462af-4c24-11df-85e6-1f98aa81cd11'}}}
>>> sns.subscribe_sqs_queue('arn:aws:sns:us-east-1:963068290131:TestSQSTopic', queue)
That should be all you have to do to subscribe your SQS queue to an SNS topic. The basic operations performed are:
- Construct the ARN for the SQS queue. In our example the URL for the queue is https://queue.amazonaws.com/963068290131/TestSNSNotification but the ARN would be "arn:aws:sqs:us-east-1:963068290131:TestSNSNotification"
- Subscribe the SQS queue to the SNS topic
- Construct a JSON policy that grants permission to SNS to perform a SendMessage operation on the queue. See below for an example of the JSON policy.
- Associate the new policy with the SQS queue by calling the set_attribute method of the Queue object with an attribute name of "Policy" and the attribute value being the JSON policy.
The actual policy looks like this:
{"Version": "2008-10-17", "Statement": [{"Resource": "arn:aws:sqs:us-east-1:963068290131:TestSNSNotification", "Effect": "Allow", "Sid": "ad279892-1597-46f8-922c-eb2b545a14a8", "Action": "SQS:SendMessage", "Condition": {"StringLike": {"aws:SourceArn": "arn:aws:sns:us-east-1:963068290131:TestSQSTopic"}}, "Principal": {"AWS": "*"}}]}
The new subscribe_sqs_queue method is available in the current SVN trunk. Check it out and let me know if you run into any problems or have any questions.
Wednesday, February 24, 2010
Pick Your SimpleDB Flavor: AP or CP?
Back around 2000, a fellow named Eric Brewer posited something called the CAP theorem. The basic tenants of this theorem are that in the world of shared data, distributed computing there are three basic properties; data consistency, system availability and tolerance to network partitioning, and only 2 of the 3 properties can be achieved at any given time (see Werner Vogel's article or this paper for more details on CAP).
SimpleDB is a great service from AWS that provides a fast, scalable metadata store that I find useful in many different systems and applications. When viewed through the prism of the CAP theorem, SimpleDB provides system availability (A) and tolerance to network partitioning (P) at the expense of consistency (C). So, as a AP system it means users have to understand and deal with the lack of consistency or "eventual consistency". For many types of systems, this lack of consistency is not a problem and given that the vast majority of writes to SimpleDB are consistent in a short period of time (most in less than a second) it's not a big deal.
But what happens if you really do need consistency? For example, let's say you want to store a user's session state in SimpleDB. Each time the user makes another request on your web site you will want to pull their saved session data from the database. But if that state is not guaranteed to be the most current data written it will cause problems for your user. Or you may have a requirement to implement an incrementing counter. Without consistency, such a requirement would be impossible. Which would mean that using SimpleDB for those types of applications would be out of the question. Until now...
Pick Your Flavor
SimpleDB now provides a new set of API requests that let you perform reads and writes in a consistent manner (see this for details). For example, I can now look up an item in SimpleDB or perform a search and specify that I want the results to be consistent. By specifying a consistent flag in these requests, SimpleDB will guarantee that the results returned will be consistent with all write operations received by the SimpleDB prior to the read or query request.
Similarly, you can create or update a value of an object in SimpleDB and provide with the request information about what you expect the current value of that object to be. If your expected values differ from the actual values currently stored in SimpleDB, an exception will be raised and the value will not be updated.
Of course, nothing is free. By insisting on Consistency, the CAP theorem says that we must be giving up on one of the other properties. In this case, we are giving up on is Availability. Basically, if we want the system to give us consistent data then it simply won't be able to respond as quickly as before. It will have to wait until it knows the state is consistent and while it is waiting, the system is unavailable to your application. Of course, that's exactly how every relational database you have ever used works so that should be no surprise. But if performance and availability are your main goals, you should use these Consistency features sparingly.
Give It A Try
The boto subversion repository has already been updated with code that supports these new consistency features. The API changes are actually quite small; a new, optional consistent_read parameter to methods like get_attributes and select and a new, optional expected_values parameter to methods like put_attributes and delete_attributes. I'll be posting some example code here soon.
SimpleDB is a great service from AWS that provides a fast, scalable metadata store that I find useful in many different systems and applications. When viewed through the prism of the CAP theorem, SimpleDB provides system availability (A) and tolerance to network partitioning (P) at the expense of consistency (C). So, as a AP system it means users have to understand and deal with the lack of consistency or "eventual consistency". For many types of systems, this lack of consistency is not a problem and given that the vast majority of writes to SimpleDB are consistent in a short period of time (most in less than a second) it's not a big deal.
But what happens if you really do need consistency? For example, let's say you want to store a user's session state in SimpleDB. Each time the user makes another request on your web site you will want to pull their saved session data from the database. But if that state is not guaranteed to be the most current data written it will cause problems for your user. Or you may have a requirement to implement an incrementing counter. Without consistency, such a requirement would be impossible. Which would mean that using SimpleDB for those types of applications would be out of the question. Until now...
Pick Your Flavor
SimpleDB now provides a new set of API requests that let you perform reads and writes in a consistent manner (see this for details). For example, I can now look up an item in SimpleDB or perform a search and specify that I want the results to be consistent. By specifying a consistent flag in these requests, SimpleDB will guarantee that the results returned will be consistent with all write operations received by the SimpleDB prior to the read or query request.
Similarly, you can create or update a value of an object in SimpleDB and provide with the request information about what you expect the current value of that object to be. If your expected values differ from the actual values currently stored in SimpleDB, an exception will be raised and the value will not be updated.
Of course, nothing is free. By insisting on Consistency, the CAP theorem says that we must be giving up on one of the other properties. In this case, we are giving up on is Availability. Basically, if we want the system to give us consistent data then it simply won't be able to respond as quickly as before. It will have to wait until it knows the state is consistent and while it is waiting, the system is unavailable to your application. Of course, that's exactly how every relational database you have ever used works so that should be no surprise. But if performance and availability are your main goals, you should use these Consistency features sparingly.
Give It A Try
The boto subversion repository has already been updated with code that supports these new consistency features. The API changes are actually quite small; a new, optional consistent_read parameter to methods like get_attributes and select and a new, optional expected_values parameter to methods like put_attributes and delete_attributes. I'll be posting some example code here soon.
Tuesday, February 9, 2010
Using S3 Versioning and MFA to CMA*
* - CMA = Cover My Ass
Amazon's Simple Storage Service (S3) is a great way to safely store loads of data in the cloud. It's highly available, simple to use and provides good data durability by automatically copying your data across multiple regions and/or zones. With over 80 billion objects stored (at last published count) I'm clearly not alone in thinking it's a good thing.
The only problem I've had with S3 over the years is the queazy feeling I get when I think about some nefarious individual getting hold of my AWS AccessKey/SecretKey. Since all S3 capabilities are accessed via a REST API and since that credential pair is used to authenticate all requests with S3, a bad guy/girl with my credentials (or a temporarily stupid version of me) could potentially delete all of the content I have stored in S3. That represents the "Worst Case Scenario" of S3 usage and I've spent a considerable amount of time and effort trying to find ways to mitigate this risk.
Using multiple AWS accounts can help. The Import/Export feature is another way to mitigate your exposure. But what I've always wanted was a WORM (Write Once Read Many) bucket. Well, not always, but at least since May 6, 2007. That would give me confidence that the data I store in S3 could not be accidentally or maliciously deleted. This kind of feature would also provide some interesting functionality for certain types of compliance and regulatory solutions.
Starting today, AWS has released a couple of really useful new features in S3: Versioning and MFADelete. Together, these features provide just about everything I wanted when I asked for a WORM bucket. So, how do they work?
Versioning
Versioning allows you to have multiple copies of the same object. Each version has a unique version ID and the versions are kept in ascending order by the date the version was created. Each bucket can be configured to either enable or disable versioning (only by the bucket owner) and the basic behavior is shown below in the table. The behavior of a Versioned bucket differs based on whether it is being accessed by a Version-Aware (VA) client or NonVersion-Aware (NVA) client.
The above table is just a summary. You should see the S3 documentation for full details but even this summary clearly shows the benefits of versioning. If I enable versioning on a bucket, the chance of accidentally deleting content is greatly reduced. I would have to be using a version-aware delete tool and explicitly referencing individual version ID's to permanently delete them.
So, accidental deletion of content is less of a risk with versioning but how about the other risk? If a bad guy/girl gets my AccessKey/SecretKey, they can still delete all of my content as long as they know how to use the versioning feature of S3. To address this threat, S3 has implemented a new feature called MFADelete.
MFADelete
MFADelete uses the Multi-Factor Authentication device you are already using to protect AWS Portal and Console access. What? You aren't using the MFA device? Well, you should go sign up for one right now. It's well worth the money, especially if you are storing important content in S3.
Like Versioning, MFADelete can be enabled on a bucket-by-bucket basis and only by the owner of the bucket. But, rather than just trusting that the person with the AccessKey/SecretKey is the owner, MFADelete uses the MFA device to provide an additional factor of authentication. To enable MFADelete, you send a special PUT request to S3 with an XML body that looks like this:
<?xml version="1.0" encoding="UTF-8"?>
<VersioningConfiguration xmlns="http://s3.amazonaws.com/doc/2006-03-01/">
<Status>Enabled</Status>
<MfaDelete>Enabled</MfaDelete>
</VersioningConfiguration>
In addition to this XML body, you also need to send a special HTTP header in the request, like this:
x-amz-mfa: <serial number of MFA device> <token from MFA device>
Once this request has been sent, all delete operations on the bucket and all requests to change the MFADelete status for the bucket will also require the special HTTP header with the MFA information. So, that means that even if the bad guy/girl gets your AccessKey/SecretKey combo they still won't be able to delete anything from your MFADelete-enabled bucket without the MFA device, as well.
It's not exactly the WORM bucket I was originally hoping for but it's a huge improvement and greatly reduces the risk of accidental or malicious deletion of data from S3. I got my pony!
The code in the boto subversion repo has already been updated to work with the new Versioning and MFADelete features. A new release will be out in the near future. I have included a link below to a unit test script that shows most of the basic operations and should give you a good start on incorporating these great new features into your application. The script prompts for you for the serial number of your MFA device once and then prompts for a new MFA code each time on is required. You can only perform one operation with each code so you will have to wait for the device to cycle to the next code between each operation.
Example Code
Amazon's Simple Storage Service (S3) is a great way to safely store loads of data in the cloud. It's highly available, simple to use and provides good data durability by automatically copying your data across multiple regions and/or zones. With over 80 billion objects stored (at last published count) I'm clearly not alone in thinking it's a good thing.
The only problem I've had with S3 over the years is the queazy feeling I get when I think about some nefarious individual getting hold of my AWS AccessKey/SecretKey. Since all S3 capabilities are accessed via a REST API and since that credential pair is used to authenticate all requests with S3, a bad guy/girl with my credentials (or a temporarily stupid version of me) could potentially delete all of the content I have stored in S3. That represents the "Worst Case Scenario" of S3 usage and I've spent a considerable amount of time and effort trying to find ways to mitigate this risk.
Using multiple AWS accounts can help. The Import/Export feature is another way to mitigate your exposure. But what I've always wanted was a WORM (Write Once Read Many) bucket. Well, not always, but at least since May 6, 2007. That would give me confidence that the data I store in S3 could not be accidentally or maliciously deleted. This kind of feature would also provide some interesting functionality for certain types of compliance and regulatory solutions.
Starting today, AWS has released a couple of really useful new features in S3: Versioning and MFADelete. Together, these features provide just about everything I wanted when I asked for a WORM bucket. So, how do they work?
Versioning
Versioning allows you to have multiple copies of the same object. Each version has a unique version ID and the versions are kept in ascending order by the date the version was created. Each bucket can be configured to either enable or disable versioning (only by the bucket owner) and the basic behavior is shown below in the table. The behavior of a Versioned bucket differs based on whether it is being accessed by a Version-Aware (VA) client or NonVersion-Aware (NVA) client.
| Operation | Unversioned Bucket | Versioned Bucket - NVA Client | Versioned Bucket - VA Client |
|---|---|---|---|
| GET | Retrieves the object or a 404 if the object is not found | Retrieves the latest version or a 404 if a Delete Marker is found | Retrieves the version specified by provided version ID |
| PUT | Stores the content in the bucket, overwriting any existing content | Stores content as new version | Stores content as new version |
| DELETE | Irrevocably deletes the content | Stores a DeleteMarker as latest version of object. | Permanently deletes version specified by provided version ID |
The above table is just a summary. You should see the S3 documentation for full details but even this summary clearly shows the benefits of versioning. If I enable versioning on a bucket, the chance of accidentally deleting content is greatly reduced. I would have to be using a version-aware delete tool and explicitly referencing individual version ID's to permanently delete them.
So, accidental deletion of content is less of a risk with versioning but how about the other risk? If a bad guy/girl gets my AccessKey/SecretKey, they can still delete all of my content as long as they know how to use the versioning feature of S3. To address this threat, S3 has implemented a new feature called MFADelete.
MFADelete
MFADelete uses the Multi-Factor Authentication device you are already using to protect AWS Portal and Console access. What? You aren't using the MFA device? Well, you should go sign up for one right now. It's well worth the money, especially if you are storing important content in S3.
Like Versioning, MFADelete can be enabled on a bucket-by-bucket basis and only by the owner of the bucket. But, rather than just trusting that the person with the AccessKey/SecretKey is the owner, MFADelete uses the MFA device to provide an additional factor of authentication. To enable MFADelete, you send a special PUT request to S3 with an XML body that looks like this:
<?xml version="1.0" encoding="UTF-8"?>
<VersioningConfiguration xmlns="http://s3.amazonaws.com/doc/2006-03-01/">
<Status>Enabled</Status>
<MfaDelete>Enabled</MfaDelete>
</VersioningConfiguration>
In addition to this XML body, you also need to send a special HTTP header in the request, like this:
x-amz-mfa: <serial number of MFA device> <token from MFA device>
Once this request has been sent, all delete operations on the bucket and all requests to change the MFADelete status for the bucket will also require the special HTTP header with the MFA information. So, that means that even if the bad guy/girl gets your AccessKey/SecretKey combo they still won't be able to delete anything from your MFADelete-enabled bucket without the MFA device, as well.
It's not exactly the WORM bucket I was originally hoping for but it's a huge improvement and greatly reduces the risk of accidental or malicious deletion of data from S3. I got my pony!
The code in the boto subversion repo has already been updated to work with the new Versioning and MFADelete features. A new release will be out in the near future. I have included a link below to a unit test script that shows most of the basic operations and should give you a good start on incorporating these great new features into your application. The script prompts for you for the serial number of your MFA device once and then prompts for a new MFA code each time on is required. You can only perform one operation with each code so you will have to wait for the device to cycle to the next code between each operation.
Example Code
Wednesday, December 16, 2009
Private and Streaming Distributions in CloudFront
Boto has supported the CloudFront content delivery service since it's initial launch in November of 2008. CloudFront has recently launched a couple of great new features:
- Distributing Private Content
- Streaming Distributions
While adding support for these features to boto, I also took the opportunity to (hopefully) improve the overall boto support for CloudFront. In this article, I'll take a quick tour of the new CloudFront features and in the process cover the improved support for CloudFront in boto.
First, a little refresher. The main abstraction in CloudFront is a Distribution and in CloudFront all Distributions are backed by an S3 bucket, referred to as the Origin. Until recently, all content distributed by CloudFront had to be public content because there was no mechanism to control access to the content.
To create a new Distribution for public content, let's assume that we already have an S3 bucket called my-origin that we want to use as the Origin:
>>> import boto
>>> c = boto.connect_cloudfront()
>>> d = c.create_distribution(origin='my-origin.s3.amazonaws.com', enabled=True, caller_reference='My Distribution')
>>> d.domain_name
d33unmref5340o.cloudfront.net
So, d now points to my new CloudFront Distribution, backed by my S3 bucket called my-origin. Boto makes it easy to add content objects to my new Distribution. For example, let's assume that I have a JPEG image on my local computer that I want to place in my new Distribution:
>>> fp = open('/home/mitch/mycoolimage.jpg')
>>> obj = d.add_object('mycoolimage.jpg', fp)
>>>
Not only does the add_object method copy the content to the correct S3 bucket, it also makes sure the S3 ACL is set correctly for the type of Distribution. In this case, since it is a public Distribution the content object will be publicly readable.
You can also list all objects currently in the Distribution (or rather it's underlying bucket) by calling the get_objects method and you can also get the CloudFront URL for any object by using it's url method:
>>> d.get_objects()
[] >>> obj.url() http://d33unmref5340o.cloudfront.net/mycoolimage.jpg
Don't Cross the Streams
The recently announced streaming feature of CloudFront will be of interest to anyone that needs to server audio or video. The nice thing about streaming is that only the content that the user actually watches or listens to is downloaded so if you have users with short attention spans, you can potentially save a lot of bandwidth costs. Plus, the streaming protocols support the ability to serve different quality media based on the user's available bandwidth.
To take advantage of these cool features, all you have to do is store streamable media files (e.g. FLV, MP3, MP4) in your origin bucket and then CloudFront will make those files available via RTMP, RTMPT, RTMPE or RTMPTE protocol using Adobe's Flash Media Server (see the CloudFront Developer's Guide for details).
The process for creating a new Streaming Distribution is almost identical to the above process.
>>> sd = c.create_streaming_distribution('my-origin.s3.amazonaws.com', True, 'My Streaming Distribution')
>>> fp = open('/home/mitch/embarrassingvideo.flv')
>>> strmobj = sd.add_object('embarrassingvideo.flv', fp)
>>> strmobj.url()
u'rtmp://sj6oeasqgt12x.cloudfront.net/cfx/st/embarrassingvideo.flv'
Note that the url method still returns the correct URL to embed in your media player to access the streaming content.
My Own Private Idaho
Another new feature in CloudFront is the ability to distribute private content across the CloudFront content delivery network. This is really a two-part process:
- Secure the content in S3 so only you and CloudFront have access to it
- Create signed URL's pointing to the secure content that can be distributed to whoever you want to be able to access the content
I'm only going to cover the first part of the process here. The CloudFront Developer's Guide provides detailed instructions for creating the signed URL's. Eventually, I'd like to be able to create the signed URL's directly in boto but doing so requires some non-standard Python libraries to handle the RSA-SHA1 signing and that is something I try to avoid in boto.
Let's say that we want to take the public Distribution I created above and turn it into a private Distribution. The first thing we need to do is create an Origin Access Identity (OAI). The OAI is a kind of virtual AWS account. By granting the OAI (and only the OAI) read access to your private content it allows you to keep the content private but allow the CloudFront service to access it.
Let's create a new Origin Access Identity and associate it with our Distribution:
>>> oai = c.create_origin_access_identity('my_oai', 'An OAI for testing')
>>> d.update(origin_access_identity=oai)
If there is an Origin Access Identity associated with a Distribution then the add_object method will ensure that the ACL for any objects added to the distribution is set so that the OAI has READ access to the object. In addition, by default it will also configure the ACL so that all other grants are removed so only the owner and the OAI have access. You can override this behavior by passing replace=False to the add_object call.
Finally, boto makes it easy to add trusted signers to your private Distribution. A trusted signer is another AWS account that has been authorized to create signed URL's for your private Distribution. To enable another AWS account, you need that accounts AWS Account ID (see this for an explanation about the Account ID).
>>> from boto.cloudfront.signers import TrustedSigners
>>> ts = TrustedSigners()
>>> ts.append('084307701560')
>>> d.update(trusted_signers=ts)
As I said earlier, I'm not going to go into the process of actually creating the signed URL's in this blog post. The CloudFront docs do a good job of explaining this and until I come up with a way to support the signing process in boto, I don't really have anything to add.
Tuesday, December 1, 2009
API Maturity in Cloud Services
I think one point people often overlook when discussing common cloud API's is the overall maturity of API's for different types of cloud services. Trying to achieve commonality on API's that have not yet reached maturity can be a frustrating and time-consuming effort. So, how stable are the API's for common cloud computing services? This article focuses on a couple of different measures of API maturity to try to answer that question.
API Churn
One measure of API maturity is churn. In other words, how much is the API changing. Mature API's should show relatively small amounts of churn while immature, evolving API's will show increased levels of churn. The chart below shows one measurement of churn, namely the growth in the API. For HTTP-based API's, this can easily be measured by the number of different types of requests supported by the API.

This chart is showing us the number of API requests supported by each of the services at launch compared to the number of API requests currently supported by the services. The EC2 API has grown from 14 requests at launch (08/24/2006) compared to 71 requests today. This includes requests for the CloudWatch, AutoScaling and Elastic Load Balancing services which are essentially part of EC2. Even if you exclude those services, though, the total is now 47 API requests for EC2 today, a 3X growth. In comparison, S3 went from 8 API requests to 13 and SQS actually reduced their API requests from 12 to 11.
During this same time period, EC2 has published 17 API version while SQS has published only 4 and S3 is still running the same API version published at launch, even though some new capabilities have been added.
API Consistency
Another way to measure maturity is to compare similar API's offered by different vendors. Mature API's should show a great deal of similarity among the different API's while immature API's will tend to show many differences. The reasoning behind this is that a mature API should be based on a well-defined set of abstractions and therefore the type and number of API calls dealing with those abstractions should be similar across vendors. In an immature API, the abstractions have not yet been fully fleshed out and you will see more variation among similar API's from different vendors.
First, let's compare Amazon's Simple Queue Service with Microsoft's Azure Queue Service:

This graph is comparing the number of API requests that are common between the different vendors (shown in blue) versus the number of API requests that are unique in a particular vendor's API (shown in red). An API request is considered common if both API's have similar requests with similar actions and side effects. Large blue bars and small red bars indicate more consistent API's whereas large red bars and small blue bars indicate less inconsistent API's. The graph shows a fairly high degree of consistency between the two different queue service API's.
Now let's compare Amazon's Simple Storage Service with Rackspace's CloudFiles and Microsoft's Azure Blob Service:

Again, we see a fairly high degree of consistency across all three API's. The major difference is related to the Azure Blob service's handling of large Blob's. It places a limit of 64 MB on individual pages within a Blob and allows multiple pages to be associated with a particular page. The other services have no equivalent abstraction, hence the differences.
Now let's compare Amazon's EC2 service with Rackspace's CloudServers:

Here we see the opposite of the graphs for the queue and storage services. The large red bars indicate a large number of API requests that are unique to a particular vendor's API and a relatively small number of API requests that are common across both vendors. In fact, aside from the basic operations of listing instances, starting/stopping instances, and listing/creating and deleting available images, it was difficult to even compare the two API's. The handling of IP addresses, networking, firewalls, security credentials, block storage, etc. were unique to each vendor.
So, does that mean that common cloud API's are impossible? Of course not. However, I do believe that achieving meaningful levels of functionality across multiple vendors API's (especially around servers) is building on a shifting and incomplete set of abstractions at this point. Solidifying those abstractions is key to achieving useful interoperability.
Friday, October 30, 2009
Using RDS in Boto
Initial support for RDS has just been added to boto. The code currently lives in the subversion trunk but a new boto release will be out very soon that will also include the new RDS module. To get things started, I'll give a short tutorial on using RDS.
The first thing we need to do is create a connection to the RDS service. This is done in the same way all other service connections are created in boto:
Ultimately, we want to create a new DBInstance, basically an EC2 instance that has been pre-configured to run MySQL. Before we can do that, we need to create a couple of things that are required when creating a new DBInstance. First, we will need a DBSecurityGroup. This is very similar to the SecurityGroup used in EC2 but it's considerably more simple because it is focused on only one type of application, MySQL. Within a DBSecurityGroup I can authorize access either by a CIDR block or by specifying an existing EC2 SecurityGroup. Since I'm going to be accessing my DBInstance from an EC2 instance, I'm just going to authorize the EC2 SecurityGroup that my instance is running in. Let's assume it's the group "default":
Now that we have a DBSecurityGroup created, we now need a DBParameterGroup. The DBParameterGroup is what's used to manage all of the configuration settings you would normally have in your MySQL config file. Because you don't have direct access to your DBInstance (unlike a normal EC2 instance) you need to use the DBParameterGroup to retrieve and modify the configuration settings for your DBInstance. Let's create a new one:
The ParameterGroup object in boto subclasses dict, so it behaves just like a normal mapping type. Each key in the ParameterGroup is the name of a config entry and it's value is a Parameter object. Let's explore one of the Parameters in the ParameterGroup. Because the set of parameters is quite large, RDS doesn't send all of the default parameter settings to you when you create a new ParameterGroup. To fetch them from RDS, we need to call get_params:
Because the Parameters have information about the type of the data and allowable ranges, we can do a pretty good job of validating values before sending them back to RDS with the apply method.
Now that we have a DBSecurityGroup and DBParameterGroup created, we can create our DBInstance.
At this point, RDS will start the process of bringing up a new MySQL instance based on my specifications. There are lots of other parameters available to tweak. In addition, you can do things like set the preferred maintenance window and when you would prefer to have snapshots run. To check on the status of our instance, we can do the following:
So, at this point our new DBInstance is up and running and we have the endpoint and port number we need to connect to it. One of the nice things about RDS is that once the instance is running, I can use RDS to perform a lot of the management tasks associated with the server. I can do snapshots of the server at any time, or I can automate that process. I can change any of the parameters associated with the server and decide whether I want those changes to take place immediately or to wait until the next maintenance window. I can also use the modify_dbinstance method to tell RDS to increase the allocated storage on my server or even move my instance up to a larger instance class.
The current RDS code is checked in. It's still beta quality but we will be releasing a 1.9 version of boto early next week which will include this code as well as support for VPC and a ton of bug fixes. So, if you get a chance, give the boto RDS module a try and let us know what you think.
The first thing we need to do is create a connection to the RDS service. This is done in the same way all other service connections are created in boto:
>>> import boto
>>> rds = boto.connect_rds()
Ultimately, we want to create a new DBInstance, basically an EC2 instance that has been pre-configured to run MySQL. Before we can do that, we need to create a couple of things that are required when creating a new DBInstance. First, we will need a DBSecurityGroup. This is very similar to the SecurityGroup used in EC2 but it's considerably more simple because it is focused on only one type of application, MySQL. Within a DBSecurityGroup I can authorize access either by a CIDR block or by specifying an existing EC2 SecurityGroup. Since I'm going to be accessing my DBInstance from an EC2 instance, I'm just going to authorize the EC2 SecurityGroup that my instance is running in. Let's assume it's the group "default":
>>> sg = rds.create_dbsecurity_group('group1', 'My first DB Security group')
>>> ec2 = boto.connect_ec2()
>>> my_ec2_group = ec2.get_all_security_groups(['default'])[0]
>>> sg.authorize(ec2_group=my_ec2_group)
Now that we have a DBSecurityGroup created, we now need a DBParameterGroup. The DBParameterGroup is what's used to manage all of the configuration settings you would normally have in your MySQL config file. Because you don't have direct access to your DBInstance (unlike a normal EC2 instance) you need to use the DBParameterGroup to retrieve and modify the configuration settings for your DBInstance. Let's create a new one:
>>>pg = rds.create_parameter_group('paramgrp1', description='My first param group.')
The ParameterGroup object in boto subclasses dict, so it behaves just like a normal mapping type. Each key in the ParameterGroup is the name of a config entry and it's value is a Parameter object. Let's explore one of the Parameters in the ParameterGroup. Because the set of parameters is quite large, RDS doesn't send all of the default parameter settings to you when you create a new ParameterGroup. To fetch them from RDS, we need to call get_params:
>>> pg.get_params()
>>> pg.keys()
[u'default_week_format',
 u'lc_time_names',
 u'innodb_autoinc_lock_mode',
 u'collation_server',
<...>
  u'key_buffer_size',
 u'key_cache_block_size',
 u'log-bin']
>>> param = pg['max_allowed_packet']
>>> param.name
u'max_allowed_packet'
>>> param.type
u'integer'
>>> param.allowed_values
u'1024-1073741824'
>>> param.value = -5
---------------------------------------------------------------------------
ValueError                                Traceback (most recent call last)

ValueError: range is 1024-1073741824
>>> param.value = 2048
>>> param.apply()
Because the Parameters have information about the type of the data and allowable ranges, we can do a pretty good job of validating values before sending them back to RDS with the apply method.
Now that we have a DBSecurityGroup and DBParameterGroup created, we can create our DBInstance.
>>> inst = rds.create_dbinstance(id='dbinst1', allocated_storage=10,
instance_class='db.m1.small', master_username='mitch',
master_password='topsecret', param_group='paramgrp1',
security_group='group1')
At this point, RDS will start the process of bringing up a new MySQL instance based on my specifications. There are lots of other parameters available to tweak. In addition, you can do things like set the preferred maintenance window and when you would prefer to have snapshots run. To check on the status of our instance, we can do the following:
>>> rs = rds.get_all_dbinstances()
>>> rs
[DBInstance:dbinst1]
>>> inst = rs[0]
>>> inst.status
>>> u'available'
>>> inst.endpoint
>>> (u'dbinst1.c07mrl4pthxk.us-east-1.rds.amazonaws.com', 3306)
So, at this point our new DBInstance is up and running and we have the endpoint and port number we need to connect to it. One of the nice things about RDS is that once the instance is running, I can use RDS to perform a lot of the management tasks associated with the server. I can do snapshots of the server at any time, or I can automate that process. I can change any of the parameters associated with the server and decide whether I want those changes to take place immediately or to wait until the next maintenance window. I can also use the modify_dbinstance method to tell RDS to increase the allocated storage on my server or even move my instance up to a larger instance class.
The current RDS code is checked in. It's still beta quality but we will be releasing a 1.9 version of boto early next week which will include this code as well as support for VPC and a ton of bug fixes. So, if you get a chance, give the boto RDS module a try and let us know what you think.
Tuesday, October 27, 2009
RDS: The End of SimpleDB?
The recent announcement of Amazon's Relational Database Service is generating a lot of buzz. And well it should. For people who require a relational database for their applications and have been rolling their own with EC2 and EBS, it offers a really nice option. Let AWS manage that database for you and focus more attention on your app. It also represents another inevitable step up the ladder from IaaS to PaaS for AWS and gives pretty good triangulation data about where cloud computing will be in a few years.
But does RDS also mean the end of SimpleDB? There have already been posts on the SimpleDB forum to that affect. I think the answer is "no" but it does illustrate what I think has been a misstep in the evolution of SimpleDB.
Let me start by saying that I love SimpleDB. I use it all the time. I have built a number of real applications and services with it and in my experience it "just works". I know there are some applications that just require a full-blown relational database but in my experience I've been able to do everything I need to do with SimpleDB. And I absolutely love the fact that it's just there as a service, doing whatever it needs to do to scale along with my app.
But it seems like SimpleDB has always been a bit of a red-headed stepchild at AWS. They haven't had a clear, consistent strategy for it. When people compared it to a relational database, rather than following the NoSQL philosophy they tried to make SimpleDB look more like a relational database. They deprecated it's elegant set-based query language with a SQL subset in hopes of attracting the relational crowd. But I think mainly what happens is that people focus on the "subset" aspect and are always pining for yet more SQL compatibility. I just don't think it won them many converts.
So, does RDS represent the end of SimpleDB? I really don't think so. The two offerings are very, very different. AWS needs to embrace that difference and communicate it more clearly. There are a lot of applications out there that can benefit from the lightweight, super-scalable, and easy to use qualities of SimpleDB. MySQL simply can't compete on those dimensions. I'm pretty sure AWS agrees but it would be nice to see some positive reinforcement from them soon, before their user base get's scared. I don't think that building RDS on the back of SimpleDB is what AWS had in mind.
But does RDS also mean the end of SimpleDB? There have already been posts on the SimpleDB forum to that affect. I think the answer is "no" but it does illustrate what I think has been a misstep in the evolution of SimpleDB.
Let me start by saying that I love SimpleDB. I use it all the time. I have built a number of real applications and services with it and in my experience it "just works". I know there are some applications that just require a full-blown relational database but in my experience I've been able to do everything I need to do with SimpleDB. And I absolutely love the fact that it's just there as a service, doing whatever it needs to do to scale along with my app.
But it seems like SimpleDB has always been a bit of a red-headed stepchild at AWS. They haven't had a clear, consistent strategy for it. When people compared it to a relational database, rather than following the NoSQL philosophy they tried to make SimpleDB look more like a relational database. They deprecated it's elegant set-based query language with a SQL subset in hopes of attracting the relational crowd. But I think mainly what happens is that people focus on the "subset" aspect and are always pining for yet more SQL compatibility. I just don't think it won them many converts.
So, does RDS represent the end of SimpleDB? I really don't think so. The two offerings are very, very different. AWS needs to embrace that difference and communicate it more clearly. There are a lot of applications out there that can benefit from the lightweight, super-scalable, and easy to use qualities of SimpleDB. MySQL simply can't compete on those dimensions. I'm pretty sure AWS agrees but it would be nice to see some positive reinforcement from them soon, before their user base get's scared. I don't think that building RDS on the back of SimpleDB is what AWS had in mind.
Thursday, October 1, 2009
Managing Your AWS Credentials (Part 3)
The first part of this series described the various AWS credentials and the second part focused on some of the challenges in keeping those credentials secret. In this short update, I want to talk about a new feature available in AWS that will help you keep your credentials more secure.
The new Multi Factor Authentication (MFA) provides an additional layer of protection around access to your AWS Console and AWS Portal. As you recall from Part 1, controlling access to these areas is vitally important because they in turn allow access to all of your other AWS resources and credentials.
To use MFA, you need to sign up for the service and buy an inexpensive security device such as the one shown below:

Once you have the device and are registered for MFA, when you attempt to log in to your AWS Portal or AWS Console, you will be asked for the email address associated with the account, the (hopefully very strong) password associated with the account and then finally you will be asked to enter the 6-digit number that appears on your device when you press the little grey button.
That means that even if someone discovers your password, they still need the device before they can log in. And, even if they have the device, they still need your password. Hence the name, Multi-Factor. The devices are inexpensive and the additional security they provide for your AWS credentials is well worth the cost. I highly recommend MFA. At least for your production credentials.
Another useful new security capability is Key Rotation. This is automatically enabled for all AWS accounts and allows you to create a new AccessKeyID and SecretAccessKey but allow the old ones to remain active. In that way, you can create new keys and then begin transitioning your servers to use the new credentials and when the transition is complete, you can then disable the old credentials. That's handy anytime you think you may have been compromised but its also a good idea to do it as part of a regular security routine.
The new Multi Factor Authentication (MFA) provides an additional layer of protection around access to your AWS Console and AWS Portal. As you recall from Part 1, controlling access to these areas is vitally important because they in turn allow access to all of your other AWS resources and credentials.
To use MFA, you need to sign up for the service and buy an inexpensive security device such as the one shown below:

Once you have the device and are registered for MFA, when you attempt to log in to your AWS Portal or AWS Console, you will be asked for the email address associated with the account, the (hopefully very strong) password associated with the account and then finally you will be asked to enter the 6-digit number that appears on your device when you press the little grey button.
That means that even if someone discovers your password, they still need the device before they can log in. And, even if they have the device, they still need your password. Hence the name, Multi-Factor. The devices are inexpensive and the additional security they provide for your AWS credentials is well worth the cost. I highly recommend MFA. At least for your production credentials.
Another useful new security capability is Key Rotation. This is automatically enabled for all AWS accounts and allows you to create a new AccessKeyID and SecretAccessKey but allow the old ones to remain active. In that way, you can create new keys and then begin transitioning your servers to use the new credentials and when the transition is complete, you can then disable the old credentials. That's handy anytime you think you may have been compromised but its also a good idea to do it as part of a regular security routine.
Monday, September 28, 2009
The Complexities of Simple
Back in the early, halcyon days of Cloud Computing there was really only one game in town; Amazon Web Services. Whether by luck or cunning, Amazon got a big, hairy head start on everyone else and so if you wanted Cloud-based storage, queues or computation you used AWS and life was, well, simple.
But now that we clearly have a full-blown trend on our hands there are more choices. The good folks from Rackspace picked up on the whole Cloud-thing early on and have leveraged their expertise in more traditional colo and managed servers to bring some very compelling offerings to market. Google, after their initial knee-jerk reaction of trying to give everything away has decided that what they have might be worth paying for and is actually charging people. And Microsoft, always a late riser, has finally rubbed the sleep dirt out of their eyes and finished their second cup of coffee and is getting serious about this cloud stuff. It's clear that this is going to be a big market and there will be lots of competitors.
So, we have choices. Which is good. But it also makes things more complicated. Several efforts are now under way to bring simplicity back in the form of unifying API's or REST interfaces that promise a Rosetta stone-like ability to let your applications speak to all of the different services out there without having to learn all of those different dialects. Sounds good, right?
Well, it turns out that making things simple is far more complicated than most people realize. For one thing, the sheer number of things that need to be unified is still growing rapidly. Just over the past year or so, Amazon alone has introduced:
But even if we look at an area within this world that seems simpler and more mature, e.g. storage, the task of simplifying is actually still quite complex. As an exercise, let's compare two quite similar services; S3 from AWS and Cloud Files from Rackspace.
S3 has buckets and keys. Cloud Files has containers and objects. Both services support objects up to 5GB in size. So far, so good. S3, however, has a fairly robust ACL mechanism that allows you to grant certain permissions to certain users or groups. At the moment, Cloud Files does not support ACL's.
Even more interesting is that when you perform a GET on a container in Cloud Files, the response includes the content-type for each object within the container. However, when you perform a GET on a bucket in S3, the response does not contain the content-type of each key. You need to do a GET on the key itself to get this type of meta data.
So, if you are designing an API to unify these two similar services you will face some challenges and will probably end up with a least common denominator approach. As a user of the unifying API, you will also face challenges. Should I rely on the least common denominator capabilities or should I actually leverage the full capabilities of the underlying service? Should the API hide differences in implementations (e.g. the content-type mentioned above) even if it creates inefficiencies? Or should it expose those differences and let the developer decide? But if it does that, how is it really helping?
I understand the motivation behind most of the unification efforts. People are worried about lock-in. And there are precedents within the technology world where unifying API's have been genuinely useful, e.g. JDBC, LDAP, etc. The difference is, I think, timing. The underlying technologies were mature and lots of sorting out had already occurred in the industry. We are not yet at that point in this technology cycle and I think these unification efforts are premature and will prove largely ineffective.
But now that we clearly have a full-blown trend on our hands there are more choices. The good folks from Rackspace picked up on the whole Cloud-thing early on and have leveraged their expertise in more traditional colo and managed servers to bring some very compelling offerings to market. Google, after their initial knee-jerk reaction of trying to give everything away has decided that what they have might be worth paying for and is actually charging people. And Microsoft, always a late riser, has finally rubbed the sleep dirt out of their eyes and finished their second cup of coffee and is getting serious about this cloud stuff. It's clear that this is going to be a big market and there will be lots of competitors.
So, we have choices. Which is good. But it also makes things more complicated. Several efforts are now under way to bring simplicity back in the form of unifying API's or REST interfaces that promise a Rosetta stone-like ability to let your applications speak to all of the different services out there without having to learn all of those different dialects. Sounds good, right?
Well, it turns out that making things simple is far more complicated than most people realize. For one thing, the sheer number of things that need to be unified is still growing rapidly. Just over the past year or so, Amazon alone has introduced:
- Static IP addresses (via EIP)
- Persistent block storage (EBS)
- Load balancing
- Auto scaling
- Monitoring
- Virtual Private Clouds
But even if we look at an area within this world that seems simpler and more mature, e.g. storage, the task of simplifying is actually still quite complex. As an exercise, let's compare two quite similar services; S3 from AWS and Cloud Files from Rackspace.
S3 has buckets and keys. Cloud Files has containers and objects. Both services support objects up to 5GB in size. So far, so good. S3, however, has a fairly robust ACL mechanism that allows you to grant certain permissions to certain users or groups. At the moment, Cloud Files does not support ACL's.
Even more interesting is that when you perform a GET on a container in Cloud Files, the response includes the content-type for each object within the container. However, when you perform a GET on a bucket in S3, the response does not contain the content-type of each key. You need to do a GET on the key itself to get this type of meta data.
So, if you are designing an API to unify these two similar services you will face some challenges and will probably end up with a least common denominator approach. As a user of the unifying API, you will also face challenges. Should I rely on the least common denominator capabilities or should I actually leverage the full capabilities of the underlying service? Should the API hide differences in implementations (e.g. the content-type mentioned above) even if it creates inefficiencies? Or should it expose those differences and let the developer decide? But if it does that, how is it really helping?
I understand the motivation behind most of the unification efforts. People are worried about lock-in. And there are precedents within the technology world where unifying API's have been genuinely useful, e.g. JDBC, LDAP, etc. The difference is, I think, timing. The underlying technologies were mature and lots of sorting out had already occurred in the industry. We are not yet at that point in this technology cycle and I think these unification efforts are premature and will prove largely ineffective.
Thursday, June 18, 2009
Managing Your AWS Credentials (Part 2)
NOTE: This article was updated on June 12, 2012
AWS recently announced some new capabilities that provide a more elegant and more secure way to address this problem. Using IAM Roles for EC2 Instances you can create new IAM entity called a Role. A Role is similar to a User in that you can assign policies that control access to EC2 services and resources. However, unlike Users, a Role can only be used when the Role is "assumed" by an entity like an EC2 Instance. This means you can create a Role, associate policies with it, and the associate that Role with an instance when it is launched and a temporary set of credentials will magically be made available in the instance metadata of the newly launched instance. These temporary credentials have relatively short life spans (although they can be renewed automatically) and, since they are IAM entities, they can be easily revoked.
In addition, boto and other AWS SDK's, understand this mechanism and can automatically find the temporary credentials, use them for requests and handle the expiration. Your application doesn't have to worry about it at all. Neat!
The following code shows a simple example of using IAM Roles in boto. In this example, the policy associated with the Role allows full access to a single S3 bucket but you can use the AWS Policy Generator to create a policy for your specific needs.
Once the instance is launched, you can immediately start using boto and it will find and use the credentials associated with the Role. I think this is a huge improvement over all of the previous techniques and I recommend it.
A More Elegant Approach Emerges
The original article below discusses a number of approaches for getting your AWS credentials onto an EC2 instances. They all work but they all have significant shortcomings.AWS recently announced some new capabilities that provide a more elegant and more secure way to address this problem. Using IAM Roles for EC2 Instances you can create new IAM entity called a Role. A Role is similar to a User in that you can assign policies that control access to EC2 services and resources. However, unlike Users, a Role can only be used when the Role is "assumed" by an entity like an EC2 Instance. This means you can create a Role, associate policies with it, and the associate that Role with an instance when it is launched and a temporary set of credentials will magically be made available in the instance metadata of the newly launched instance. These temporary credentials have relatively short life spans (although they can be renewed automatically) and, since they are IAM entities, they can be easily revoked.
In addition, boto and other AWS SDK's, understand this mechanism and can automatically find the temporary credentials, use them for requests and handle the expiration. Your application doesn't have to worry about it at all. Neat!
The following code shows a simple example of using IAM Roles in boto. In this example, the policy associated with the Role allows full access to a single S3 bucket but you can use the AWS Policy Generator to create a policy for your specific needs.
Once the instance is launched, you can immediately start using boto and it will find and use the credentials associated with the Role. I think this is a huge improvement over all of the previous techniques and I recommend it.
Managing Your AWS Credentials (Part 1)
Anyone who has deployed a production system in the Amazon Web Services infrastructure has grappled with the challenge of securing the application. The majority of the issues you face in an AWS deployment are the same issues you would face in deploying your application in any other environment, e.g.:
In fact, some of the tools provided by AWS such as the distributed firewall in EC2 can actually make the process even more secure because everything can be controlled via API's. So, for example, you can shut down SSH traffic completely at the EC2 firewall and write scripts that automatically enable SSH access for your current IP and then shut that port down as soon as you have closed your SSH session with the instance.
This series of articles focuses on an aspect of security that is very specific to AWS: managing your AWS credentials. In this first installment, let's start by reviewing the various credentials associated with your AWS account because this can be confusing for new users (and sometimes even for old users!).
AWS Account Credentials
These are the credentials you use to log into the AWS web portal and the AWS Management Console. This consists of an email address and a password. Since these credentials control access to all of the other credentials discussed below, it is very important to choose a strong password for this account and to age the password aggressively. I recommend using a service like random.org to generate 10-12 character random strings (longer is even better). Securing access to the portal should be your primary security goal.
AWS Account Number
This is the unique 12-digit number associated with your AWS account. Unlike the other credentials we will discuss, this one is not a secret. The easiest way to find your account number is to look in the upper-right corner of the web page after you have logged into the AWS portal. You should see something like this:
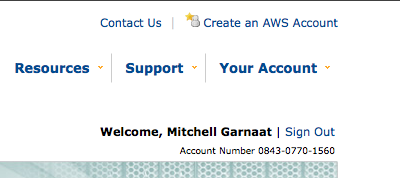
The Account Number is a public identifier and is used mainly for sharing resources within AWS. For example, if I create a AMI in EC2 and I want to share that AMI with a specific user without making the AMI public, I would need to add that user's Account Number to the list of user id's associated with the AMI (see this for details). One source of confusion here is that even though the Account Number is displayed with hyphens separating the three groups of four digits, when used via the API the hyphens must be removed.
Once you are logged into the AWS portal, you will see a page titled "Access Identifiers". There are really two types of Access Identifiers.
AccessKeyID and SecretAccessKey
These Access Identifiers are at the heart of all API access in AWS. Virtually every REST or Query API request made to every AWS service requires you to pass your AccessKeyID as part of the request to identify who you are. Then, to prove that you really are who you say you are, the API's also require to you compute and include a Signature in the request.
The Signature is calculated by concatenating a number of elements of the request (e.g. timestamp, request name, parameters, etc.) into a StringToSign and then creating a Signature by computing an HMAC of the StringToSign using your SecretAccessKey as the key (see this for more details on request signing).
When the request is received by AWS, the service concatenates the same StringToSign and then computes the HMAC based on the SecretAccessKey AWS has associated with the AccessKeyID sent in the request. If they match, the request is authenticated. If not, it is rejected.
The AccessKeyID associated with an account cannot be changed but the SecretAccessKey can be regenerated at any time using the AWS portal. Because the SecretAccessKey is the shared secret upon which the entire authentication mechanism is based, if there is any risk that your SecretAccessKey has been compromised you should regenerate it. In fact, it would be a good practice to age your SecretAccessKey in the same way you do the password in your AWS credentials. Just remember that once you change the SecretAccessKey, any applications that are making API calls will cease to function until their associated credentials are updated.
X.509 Certificate
The other Access Identifier associated with your account is the X.509 Certificate. You can provide your own certificate or you can have AWS generate a certificate for you. This certificate can be used for authenticating requests when using the SOAP versions of the AWS API's and it is also used when creating your own AMI's in EC2. Essentially, the files that are created when bundling an AMI are cryptographically signed using the X.509 cert associated with your account so if anyone were to try to tamper with the bundled AMI, the signature would be broken and easily detected.
When using the SOAP API's, the X.509 certificate is as critically important from a security point of view as the SecretAccessKey discussed above and should be managed just as carefully. Remember, even if you don't use SOAP, a hacker could!
SSH Keys
The final credential we need to discuss is the public/private keypair used for SSH access to an EC2 instance. By default, an EC2 instance will allow SSH access only by PublicKey authentication. I strongly recommend that you stick to this policy in any AMI's that you create for your own use. SSH keypairs can be generated via the AWS Console and API. You should create keypairs for each individual in your organization that will need access to running instances and guard those SSH keys carefully.
In fact, what I recommend is storing all of these critical credentials in an encrypted form on a USB memory stick and only on that device (and a backup copy of it to be safe, of course). You can either use a device that incorporates the encryption natively (e.g. IronKey, etc.) or you can create an encrypted disk image and store that on the USB device. Alternatively, you could just store the encrypted disk image itself on your laptop but never store these critical credentials in the clear on any computer or memory stick and definitely do not email them around or exchange them via IM, etc.
In Part 2 of this series (coming tomorrow!), I'll discuss a strategy for managing these important credentials in a production environment. Stay tuned!
- Hardening your servers by making sure you have the latest security patches for your OS and all relevant applications
- Making sure your servers are running only the services required by your application
- Reviewing file and directory ownership and permissions to minimize access to critical system files as much as possible
- Configuring SSH to use non-standard ports and accept only public key authentication
- Configure firewall rules to limit access to the smallest number of ports and CIDR blocks possible
In fact, some of the tools provided by AWS such as the distributed firewall in EC2 can actually make the process even more secure because everything can be controlled via API's. So, for example, you can shut down SSH traffic completely at the EC2 firewall and write scripts that automatically enable SSH access for your current IP and then shut that port down as soon as you have closed your SSH session with the instance.
This series of articles focuses on an aspect of security that is very specific to AWS: managing your AWS credentials. In this first installment, let's start by reviewing the various credentials associated with your AWS account because this can be confusing for new users (and sometimes even for old users!).
AWS Account Credentials
These are the credentials you use to log into the AWS web portal and the AWS Management Console. This consists of an email address and a password. Since these credentials control access to all of the other credentials discussed below, it is very important to choose a strong password for this account and to age the password aggressively. I recommend using a service like random.org to generate 10-12 character random strings (longer is even better). Securing access to the portal should be your primary security goal.
AWS Account Number
This is the unique 12-digit number associated with your AWS account. Unlike the other credentials we will discuss, this one is not a secret. The easiest way to find your account number is to look in the upper-right corner of the web page after you have logged into the AWS portal. You should see something like this:

The Account Number is a public identifier and is used mainly for sharing resources within AWS. For example, if I create a AMI in EC2 and I want to share that AMI with a specific user without making the AMI public, I would need to add that user's Account Number to the list of user id's associated with the AMI (see this for details). One source of confusion here is that even though the Account Number is displayed with hyphens separating the three groups of four digits, when used via the API the hyphens must be removed.
Once you are logged into the AWS portal, you will see a page titled "Access Identifiers". There are really two types of Access Identifiers.
AccessKeyID and SecretAccessKey
These Access Identifiers are at the heart of all API access in AWS. Virtually every REST or Query API request made to every AWS service requires you to pass your AccessKeyID as part of the request to identify who you are. Then, to prove that you really are who you say you are, the API's also require to you compute and include a Signature in the request.
The Signature is calculated by concatenating a number of elements of the request (e.g. timestamp, request name, parameters, etc.) into a StringToSign and then creating a Signature by computing an HMAC of the StringToSign using your SecretAccessKey as the key (see this for more details on request signing).
When the request is received by AWS, the service concatenates the same StringToSign and then computes the HMAC based on the SecretAccessKey AWS has associated with the AccessKeyID sent in the request. If they match, the request is authenticated. If not, it is rejected.
The AccessKeyID associated with an account cannot be changed but the SecretAccessKey can be regenerated at any time using the AWS portal. Because the SecretAccessKey is the shared secret upon which the entire authentication mechanism is based, if there is any risk that your SecretAccessKey has been compromised you should regenerate it. In fact, it would be a good practice to age your SecretAccessKey in the same way you do the password in your AWS credentials. Just remember that once you change the SecretAccessKey, any applications that are making API calls will cease to function until their associated credentials are updated.
X.509 Certificate
The other Access Identifier associated with your account is the X.509 Certificate. You can provide your own certificate or you can have AWS generate a certificate for you. This certificate can be used for authenticating requests when using the SOAP versions of the AWS API's and it is also used when creating your own AMI's in EC2. Essentially, the files that are created when bundling an AMI are cryptographically signed using the X.509 cert associated with your account so if anyone were to try to tamper with the bundled AMI, the signature would be broken and easily detected.
When using the SOAP API's, the X.509 certificate is as critically important from a security point of view as the SecretAccessKey discussed above and should be managed just as carefully. Remember, even if you don't use SOAP, a hacker could!
SSH Keys
The final credential we need to discuss is the public/private keypair used for SSH access to an EC2 instance. By default, an EC2 instance will allow SSH access only by PublicKey authentication. I strongly recommend that you stick to this policy in any AMI's that you create for your own use. SSH keypairs can be generated via the AWS Console and API. You should create keypairs for each individual in your organization that will need access to running instances and guard those SSH keys carefully.
In fact, what I recommend is storing all of these critical credentials in an encrypted form on a USB memory stick and only on that device (and a backup copy of it to be safe, of course). You can either use a device that incorporates the encryption natively (e.g. IronKey, etc.) or you can create an encrypted disk image and store that on the USB device. Alternatively, you could just store the encrypted disk image itself on your laptop but never store these critical credentials in the clear on any computer or memory stick and definitely do not email them around or exchange them via IM, etc.
In Part 2 of this series (coming tomorrow!), I'll discuss a strategy for managing these important credentials in a production environment. Stay tuned!
Tuesday, April 28, 2009
Cloud Lock-In. Not your father's lock-in.
There seems to be a lot of angst about the risks of lock-in with cloud computing. I think there are some real issues to be concerned about but most of the discussion seems to be centered around API's and I think that's wrong.
First, let's define what we mean by lock-in. This description from wikipedia provides a good, workable definition:
In the world of software development and IT, examples of things that have caused lock-in headaches would be:
But in the process of doing that, you have used features in the operating system or database or other component that are unique to that vendor's product. There may be have been good reasons at the time to do so (e.g. better performance, better integration with development tools, better manageability, etc.) but because of those decisions the cost of changing any of the significant components of that software becomes too high to be practical. You are locked-in.
In that scenario, the root cause of the lock-in problem seems to be the use of proprietary API's in the development of the application so it kind of makes sense that the focus of concern in Cloud Computing Lock-In would also be the API's. Here's why I don't think it's different for the Cloud Service case:
So, how do you mitigate that concern? Well, you could try to keep local backups of all data stored in a service like S3 but for large quantities of data that becomes impractical and diminishes the value proposition for a data storage service in the first place. The best approach is to demand that your Cloud Service vendors provide mechanisms to get large quantities of data in and out of their services via some sort of bulk load service.
Amazon doesn't yet offer such a service but I was encourage by this thread on their S3 forum which suggests that AWS is at least thinking about the possibility of such a service. I encourage them and other Cloud Services vendors like Rackspace/Mosso to make it as easy as possible to get data in AND out of your services. That's the best way to minimize concerns about vendor lock-in.
First, let's define what we mean by lock-in. This description from wikipedia provides a good, workable definition:
In economics, vendor lock-in, also known as proprietary lock-in, or customer lock-in, makes a customer dependent on a vendor for products and services, unable to use another vendor without substantial switching costs. Lock-in costs which create barriers to market entry may result in antitrust action against a monopoly.
In the world of software development and IT, examples of things that have caused lock-in headaches would be:
- Using proprietary operating system features
- Using proprietary database features
- Using hardware which can only run a proprietary OS
But in the process of doing that, you have used features in the operating system or database or other component that are unique to that vendor's product. There may be have been good reasons at the time to do so (e.g. better performance, better integration with development tools, better manageability, etc.) but because of those decisions the cost of changing any of the significant components of that software becomes too high to be practical. You are locked-in.
In that scenario, the root cause of the lock-in problem seems to be the use of proprietary API's in the development of the application so it kind of makes sense that the focus of concern in Cloud Computing Lock-In would also be the API's. Here's why I don't think it's different for the Cloud Service case:
- Sunk Cost - While the use of proprietary API's in the above example represent one barrier to change, a more significant barrier is actually the sunk cost of the current solution. In order to deploy that solution internally, a lot of money had to be spent upfront (e.g. hardware, OS server and client licenses, database licenses). To move the solution off the locked-in platform not only involves considerable re-write of the software (OpEx costs) but also new CapEx expenses and potential write-down of current capital. In the case of a Cloud Service, these sunk costs aren't a factor. The hardware and even the licensing costs for software can be paid by the hour. When you turn that server off, your costs go to zero.
- Tight Coupling vs. Loose Coupling - Even if you focus only on the API's and the rework necessary to move the solution to a different platform, the fact that Cloud Computing services focus on REST and other HTTP-based API's dramatically changes the scope of the rework when compared to moving from one low-level tighly-coupled API to another one. By definition, your code that interacts with Cloud Services will be more abstracted and loosely-coupled which will make it much easier to get it working with another vendor's Cloud Service.
So, how do you mitigate that concern? Well, you could try to keep local backups of all data stored in a service like S3 but for large quantities of data that becomes impractical and diminishes the value proposition for a data storage service in the first place. The best approach is to demand that your Cloud Service vendors provide mechanisms to get large quantities of data in and out of their services via some sort of bulk load service.
Amazon doesn't yet offer such a service but I was encourage by this thread on their S3 forum which suggests that AWS is at least thinking about the possibility of such a service. I encourage them and other Cloud Services vendors like Rackspace/Mosso to make it as easy as possible to get data in AND out of your services. That's the best way to minimize concerns about vendor lock-in.
Subscribe to:
Posts (Atom)