If you enjoyed Managing Your AWS Credentials (Parts 1 and 2), I recommend that you check out Shlomo Swidler's latest blog post. It builds on the foundational information in Parts 1 and 2 but then covers a lot of new ground and proposes some very workable approaches to managing credentials on EC2 instances. Very useful.
Yeah, I know I could have just tweeted this but sometimes it feels good to type more than 140 characters.
Monday, August 31, 2009

Sunday, June 28, 2009
Boto 1.8c Released
A new version of boto is available. Version 1.8c fixes a serious issue in the S3 module and two Unicode-related issues in the mturk module.
I recommend all boto users who were running 1.8a or 1.8b upgrade to 1.8c asap.
You can download the new release at http://boto.googlecode.com/
Mitch
I recommend all boto users who were running 1.8a or 1.8b upgrade to 1.8c asap.
You can download the new release at http://boto.googlecode.com/
Mitch
Wednesday, June 24, 2009
Boto 1.8a Released
Version 1.8a of boto, the Python library for Amazon Web Services, has been released. This version includes:
- Released support for CloudWatch, Elastic Load Balancer (ELB) and AutoScale services. Thanks to Reza Lotun for contributing the AutoScale service module!
- Support for POST on SimpleDB BatchPutAttributes requests and EC2 RunInstances requests. Both of these requests allow more data than can fit in a GET request. Supporting POST for these requests eliminates the restrictions of GET. Thanks to Andrey Smirnov and Brett Taylor from AWS for providing details on the use of POST in Query API's.
- A number of changes to further support the use of boto with Eucalyptus. Thanks to Neil Soman for his help and patience in remote debugging these changes.
- Fixes for Issues 226, 232, 233, 234, 237, 239
- Many other small fixes and improvements
Thursday, June 18, 2009
Managing Your AWS Credentials (Part 2)
NOTE: This article was updated on June 12, 2012
AWS recently announced some new capabilities that provide a more elegant and more secure way to address this problem. Using IAM Roles for EC2 Instances you can create new IAM entity called a Role. A Role is similar to a User in that you can assign policies that control access to EC2 services and resources. However, unlike Users, a Role can only be used when the Role is "assumed" by an entity like an EC2 Instance. This means you can create a Role, associate policies with it, and the associate that Role with an instance when it is launched and a temporary set of credentials will magically be made available in the instance metadata of the newly launched instance. These temporary credentials have relatively short life spans (although they can be renewed automatically) and, since they are IAM entities, they can be easily revoked.
In addition, boto and other AWS SDK's, understand this mechanism and can automatically find the temporary credentials, use them for requests and handle the expiration. Your application doesn't have to worry about it at all. Neat!
The following code shows a simple example of using IAM Roles in boto. In this example, the policy associated with the Role allows full access to a single S3 bucket but you can use the AWS Policy Generator to create a policy for your specific needs.
Once the instance is launched, you can immediately start using boto and it will find and use the credentials associated with the Role. I think this is a huge improvement over all of the previous techniques and I recommend it.
A More Elegant Approach Emerges
The original article below discusses a number of approaches for getting your AWS credentials onto an EC2 instances. They all work but they all have significant shortcomings.AWS recently announced some new capabilities that provide a more elegant and more secure way to address this problem. Using IAM Roles for EC2 Instances you can create new IAM entity called a Role. A Role is similar to a User in that you can assign policies that control access to EC2 services and resources. However, unlike Users, a Role can only be used when the Role is "assumed" by an entity like an EC2 Instance. This means you can create a Role, associate policies with it, and the associate that Role with an instance when it is launched and a temporary set of credentials will magically be made available in the instance metadata of the newly launched instance. These temporary credentials have relatively short life spans (although they can be renewed automatically) and, since they are IAM entities, they can be easily revoked.
In addition, boto and other AWS SDK's, understand this mechanism and can automatically find the temporary credentials, use them for requests and handle the expiration. Your application doesn't have to worry about it at all. Neat!
The following code shows a simple example of using IAM Roles in boto. In this example, the policy associated with the Role allows full access to a single S3 bucket but you can use the AWS Policy Generator to create a policy for your specific needs.
Once the instance is launched, you can immediately start using boto and it will find and use the credentials associated with the Role. I think this is a huge improvement over all of the previous techniques and I recommend it.
Managing Your AWS Credentials (Part 1)
Anyone who has deployed a production system in the Amazon Web Services infrastructure has grappled with the challenge of securing the application. The majority of the issues you face in an AWS deployment are the same issues you would face in deploying your application in any other environment, e.g.:
In fact, some of the tools provided by AWS such as the distributed firewall in EC2 can actually make the process even more secure because everything can be controlled via API's. So, for example, you can shut down SSH traffic completely at the EC2 firewall and write scripts that automatically enable SSH access for your current IP and then shut that port down as soon as you have closed your SSH session with the instance.
This series of articles focuses on an aspect of security that is very specific to AWS: managing your AWS credentials. In this first installment, let's start by reviewing the various credentials associated with your AWS account because this can be confusing for new users (and sometimes even for old users!).
AWS Account Credentials
These are the credentials you use to log into the AWS web portal and the AWS Management Console. This consists of an email address and a password. Since these credentials control access to all of the other credentials discussed below, it is very important to choose a strong password for this account and to age the password aggressively. I recommend using a service like random.org to generate 10-12 character random strings (longer is even better). Securing access to the portal should be your primary security goal.
AWS Account Number
This is the unique 12-digit number associated with your AWS account. Unlike the other credentials we will discuss, this one is not a secret. The easiest way to find your account number is to look in the upper-right corner of the web page after you have logged into the AWS portal. You should see something like this:
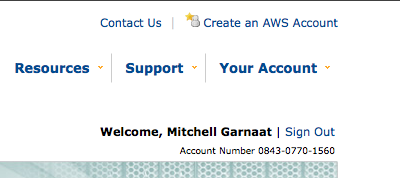
The Account Number is a public identifier and is used mainly for sharing resources within AWS. For example, if I create a AMI in EC2 and I want to share that AMI with a specific user without making the AMI public, I would need to add that user's Account Number to the list of user id's associated with the AMI (see this for details). One source of confusion here is that even though the Account Number is displayed with hyphens separating the three groups of four digits, when used via the API the hyphens must be removed.
Once you are logged into the AWS portal, you will see a page titled "Access Identifiers". There are really two types of Access Identifiers.
AccessKeyID and SecretAccessKey
These Access Identifiers are at the heart of all API access in AWS. Virtually every REST or Query API request made to every AWS service requires you to pass your AccessKeyID as part of the request to identify who you are. Then, to prove that you really are who you say you are, the API's also require to you compute and include a Signature in the request.
The Signature is calculated by concatenating a number of elements of the request (e.g. timestamp, request name, parameters, etc.) into a StringToSign and then creating a Signature by computing an HMAC of the StringToSign using your SecretAccessKey as the key (see this for more details on request signing).
When the request is received by AWS, the service concatenates the same StringToSign and then computes the HMAC based on the SecretAccessKey AWS has associated with the AccessKeyID sent in the request. If they match, the request is authenticated. If not, it is rejected.
The AccessKeyID associated with an account cannot be changed but the SecretAccessKey can be regenerated at any time using the AWS portal. Because the SecretAccessKey is the shared secret upon which the entire authentication mechanism is based, if there is any risk that your SecretAccessKey has been compromised you should regenerate it. In fact, it would be a good practice to age your SecretAccessKey in the same way you do the password in your AWS credentials. Just remember that once you change the SecretAccessKey, any applications that are making API calls will cease to function until their associated credentials are updated.
X.509 Certificate
The other Access Identifier associated with your account is the X.509 Certificate. You can provide your own certificate or you can have AWS generate a certificate for you. This certificate can be used for authenticating requests when using the SOAP versions of the AWS API's and it is also used when creating your own AMI's in EC2. Essentially, the files that are created when bundling an AMI are cryptographically signed using the X.509 cert associated with your account so if anyone were to try to tamper with the bundled AMI, the signature would be broken and easily detected.
When using the SOAP API's, the X.509 certificate is as critically important from a security point of view as the SecretAccessKey discussed above and should be managed just as carefully. Remember, even if you don't use SOAP, a hacker could!
SSH Keys
The final credential we need to discuss is the public/private keypair used for SSH access to an EC2 instance. By default, an EC2 instance will allow SSH access only by PublicKey authentication. I strongly recommend that you stick to this policy in any AMI's that you create for your own use. SSH keypairs can be generated via the AWS Console and API. You should create keypairs for each individual in your organization that will need access to running instances and guard those SSH keys carefully.
In fact, what I recommend is storing all of these critical credentials in an encrypted form on a USB memory stick and only on that device (and a backup copy of it to be safe, of course). You can either use a device that incorporates the encryption natively (e.g. IronKey, etc.) or you can create an encrypted disk image and store that on the USB device. Alternatively, you could just store the encrypted disk image itself on your laptop but never store these critical credentials in the clear on any computer or memory stick and definitely do not email them around or exchange them via IM, etc.
In Part 2 of this series (coming tomorrow!), I'll discuss a strategy for managing these important credentials in a production environment. Stay tuned!
- Hardening your servers by making sure you have the latest security patches for your OS and all relevant applications
- Making sure your servers are running only the services required by your application
- Reviewing file and directory ownership and permissions to minimize access to critical system files as much as possible
- Configuring SSH to use non-standard ports and accept only public key authentication
- Configure firewall rules to limit access to the smallest number of ports and CIDR blocks possible
In fact, some of the tools provided by AWS such as the distributed firewall in EC2 can actually make the process even more secure because everything can be controlled via API's. So, for example, you can shut down SSH traffic completely at the EC2 firewall and write scripts that automatically enable SSH access for your current IP and then shut that port down as soon as you have closed your SSH session with the instance.
This series of articles focuses on an aspect of security that is very specific to AWS: managing your AWS credentials. In this first installment, let's start by reviewing the various credentials associated with your AWS account because this can be confusing for new users (and sometimes even for old users!).
AWS Account Credentials
These are the credentials you use to log into the AWS web portal and the AWS Management Console. This consists of an email address and a password. Since these credentials control access to all of the other credentials discussed below, it is very important to choose a strong password for this account and to age the password aggressively. I recommend using a service like random.org to generate 10-12 character random strings (longer is even better). Securing access to the portal should be your primary security goal.
AWS Account Number
This is the unique 12-digit number associated with your AWS account. Unlike the other credentials we will discuss, this one is not a secret. The easiest way to find your account number is to look in the upper-right corner of the web page after you have logged into the AWS portal. You should see something like this:

The Account Number is a public identifier and is used mainly for sharing resources within AWS. For example, if I create a AMI in EC2 and I want to share that AMI with a specific user without making the AMI public, I would need to add that user's Account Number to the list of user id's associated with the AMI (see this for details). One source of confusion here is that even though the Account Number is displayed with hyphens separating the three groups of four digits, when used via the API the hyphens must be removed.
Once you are logged into the AWS portal, you will see a page titled "Access Identifiers". There are really two types of Access Identifiers.
AccessKeyID and SecretAccessKey
These Access Identifiers are at the heart of all API access in AWS. Virtually every REST or Query API request made to every AWS service requires you to pass your AccessKeyID as part of the request to identify who you are. Then, to prove that you really are who you say you are, the API's also require to you compute and include a Signature in the request.
The Signature is calculated by concatenating a number of elements of the request (e.g. timestamp, request name, parameters, etc.) into a StringToSign and then creating a Signature by computing an HMAC of the StringToSign using your SecretAccessKey as the key (see this for more details on request signing).
When the request is received by AWS, the service concatenates the same StringToSign and then computes the HMAC based on the SecretAccessKey AWS has associated with the AccessKeyID sent in the request. If they match, the request is authenticated. If not, it is rejected.
The AccessKeyID associated with an account cannot be changed but the SecretAccessKey can be regenerated at any time using the AWS portal. Because the SecretAccessKey is the shared secret upon which the entire authentication mechanism is based, if there is any risk that your SecretAccessKey has been compromised you should regenerate it. In fact, it would be a good practice to age your SecretAccessKey in the same way you do the password in your AWS credentials. Just remember that once you change the SecretAccessKey, any applications that are making API calls will cease to function until their associated credentials are updated.
X.509 Certificate
The other Access Identifier associated with your account is the X.509 Certificate. You can provide your own certificate or you can have AWS generate a certificate for you. This certificate can be used for authenticating requests when using the SOAP versions of the AWS API's and it is also used when creating your own AMI's in EC2. Essentially, the files that are created when bundling an AMI are cryptographically signed using the X.509 cert associated with your account so if anyone were to try to tamper with the bundled AMI, the signature would be broken and easily detected.
When using the SOAP API's, the X.509 certificate is as critically important from a security point of view as the SecretAccessKey discussed above and should be managed just as carefully. Remember, even if you don't use SOAP, a hacker could!
SSH Keys
The final credential we need to discuss is the public/private keypair used for SSH access to an EC2 instance. By default, an EC2 instance will allow SSH access only by PublicKey authentication. I strongly recommend that you stick to this policy in any AMI's that you create for your own use. SSH keypairs can be generated via the AWS Console and API. You should create keypairs for each individual in your organization that will need access to running instances and guard those SSH keys carefully.
In fact, what I recommend is storing all of these critical credentials in an encrypted form on a USB memory stick and only on that device (and a backup copy of it to be safe, of course). You can either use a device that incorporates the encryption natively (e.g. IronKey, etc.) or you can create an encrypted disk image and store that on the USB device. Alternatively, you could just store the encrypted disk image itself on your laptop but never store these critical credentials in the clear on any computer or memory stick and definitely do not email them around or exchange them via IM, etc.
In Part 2 of this series (coming tomorrow!), I'll discuss a strategy for managing these important credentials in a production environment. Stay tuned!
Thursday, May 21, 2009
Using EC2 CloudWatch in Boto
The new CloudWatch service from AWS provides some interesting ways to monitor EC2 instances and LoadBalancers. The code to support this new service has just been checked into the subversion repository for boto. It still needs some hardening before it will be incorporated into a new boto release but if you are interested in experimenting with CloudWatch, check out the latest boto code and let me know what you think. This post should provide just about enough to get you started.
The 5 Minute How-To Guide
First, make sure you have something to monitor. You can either create a LoadBalancer or enable monitoring on an existing EC2 instance. To enable monitoring on an existing instance, you can do something like this:
Where the "i-12345678" is the ID of your existing instance. It takes a while for the monitoring data to start accumulating but once it does, you can do this:
The list_metrics call will return a list of all of the available metrics that you can query against. Each entry in the list is a Metric object. As you can see from the list above, some of the metrics are generic metrics and some have Dimensions associated with them (e.g. InstanceType=m1.small). The Dimension can be used to refine your query. So, for example, I could query the metric Metric:CPUUtilization which would create the desired statistic by aggregating cpu utilization data across all sources of information available or I could refine that by querying the metric Metric:CPUUtilization(InstanceId,i-e573e68c) which would use only the data associated with the instance identified by the instance ID i-e573e68c.
Because for this example, I'm only monitoring a single instance, the set of metrics available to me are fairly limited. If I was monitoring many instances, using many different instance types and AMI's and also several load balancers, the list of available metrics would grow considerably.
Once you have the list of available metrics, you can actually query the CloudWatch system for the data associated with that metric. Let's choose the CPU utilization metric for our instance.
The Metric object has a query method that lets us actually perform the query against the collected data in CloudWatch. To call that, we need a start time and end time to control the time span of data that we are interested in. For this example, let's say we want the
data for the previous hour:
We also need to supply the Statistic that we want reported and the Units to use for the results. The Statistic must be one of these values:
['Minimum', 'Maximum', 'Sum', 'Average', 'Samples']
And Units must be one of the following:
['Seconds', 'Percent', 'Bytes', 'Bits', 'Count', 'Bytes/Second', 'Bits/Second', 'Count/Second']
The query method also takes an optional parameter, period. This parameter controls the granularity (in seconds) of the data returned. The smallest period is 60 seconds and the value must be a multiple of 60 seconds. So, let's ask for the average as a percent:
Our period was 60 seconds and our duration was one hour so we should get 60 data points back and we can see that we did. Each element in the datapoints list is a DataPoint object which is a simple subclass of a Python dict object. Each Datapoint object contains all of the information available about that particular data point.
My server obviously isn't very busy right now!
That gives you a quick look at the CloudWatch service and how to access the service in boto. These features are still under development and feedback is welcome so give it a try and let me know what you think.
The 5 Minute How-To Guide
First, make sure you have something to monitor. You can either create a LoadBalancer or enable monitoring on an existing EC2 instance. To enable monitoring on an existing instance, you can do something like this:
>>> import boto
>>> c = boto.connect_ec2()
>>> c.monitor_instance('i-12345678')
Where the "i-12345678" is the ID of your existing instance. It takes a while for the monitoring data to start accumulating but once it does, you can do this:
>>> import boto
>>> c = boto.connect_cloudwatch()
>>> metrics = c.list_metrics()
>>> metrics
[Metric:NetworkIn,
Metric:NetworkOut,
Metric:NetworkOut(InstanceType,m1.small),
Metric:NetworkIn(InstanceId,i-e573e68c),
Metric:CPUUtilization(InstanceId,i-e573e68c),
Metric:DiskWriteBytes(InstanceType,m1.small),
Metric:DiskWriteBytes(ImageId,ami-a1ffb63),
Metric:NetworkOut(ImageId,ami-a1ffb63),
Metric:DiskWriteOps(InstanceType,m1.small),
Metric:DiskReadBytes(InstanceType,m1.small),
Metric:DiskReadOps(ImageId,ami-a1ffb63),
Metric:CPUUtilization(InstanceType,m1.small),
Metric:NetworkIn(ImageId,ami-a1ffb63),
Metric:DiskReadOps(InstanceType,m1.small),
Metric:DiskReadBytes,
Metric:CPUUtilization,
Metric:DiskWriteBytes(InstanceId,i-e573e68c),
Metric:DiskWriteOps(InstanceId,i-e573e68c),
Metric:DiskWriteOps,
Metric:DiskReadOps,
Metric:CPUUtilization(ImageId,ami-a1ffb63),
Metric:DiskReadOps(InstanceId,i-e573e68c),
Metric:NetworkOut(InstanceId,i-e573e68c),
Metric:DiskReadBytes(ImageId,ami-a1ffb63),
Metric:DiskReadBytes(InstanceId,i-e573e68c),
Metric:DiskWriteBytes,
Metric:NetworkIn(InstanceType,m1.small),
Metric:DiskWriteOps(ImageId,ami-a1ffb63)]
The list_metrics call will return a list of all of the available metrics that you can query against. Each entry in the list is a Metric object. As you can see from the list above, some of the metrics are generic metrics and some have Dimensions associated with them (e.g. InstanceType=m1.small). The Dimension can be used to refine your query. So, for example, I could query the metric Metric:CPUUtilization which would create the desired statistic by aggregating cpu utilization data across all sources of information available or I could refine that by querying the metric Metric:CPUUtilization(InstanceId,i-e573e68c) which would use only the data associated with the instance identified by the instance ID i-e573e68c.
Because for this example, I'm only monitoring a single instance, the set of metrics available to me are fairly limited. If I was monitoring many instances, using many different instance types and AMI's and also several load balancers, the list of available metrics would grow considerably.
Once you have the list of available metrics, you can actually query the CloudWatch system for the data associated with that metric. Let's choose the CPU utilization metric for our instance.
>>> m = metrics[5]
>>> m
Metric:CPUUtilization(InstanceId,i-e573e68c)
The Metric object has a query method that lets us actually perform the query against the collected data in CloudWatch. To call that, we need a start time and end time to control the time span of data that we are interested in. For this example, let's say we want the
data for the previous hour:
>>> import datetime
>>> end = datetime.datetime.now()
>>> start = end - datetime.timedelta(hours=1)
We also need to supply the Statistic that we want reported and the Units to use for the results. The Statistic must be one of these values:
['Minimum', 'Maximum', 'Sum', 'Average', 'Samples']
And Units must be one of the following:
['Seconds', 'Percent', 'Bytes', 'Bits', 'Count', 'Bytes/Second', 'Bits/Second', 'Count/Second']
The query method also takes an optional parameter, period. This parameter controls the granularity (in seconds) of the data returned. The smallest period is 60 seconds and the value must be a multiple of 60 seconds. So, let's ask for the average as a percent:
>>> datapoints = m.query(start, end, 'Average', 'Percent')
>>> len(datapoints)
60
Our period was 60 seconds and our duration was one hour so we should get 60 data points back and we can see that we did. Each element in the datapoints list is a DataPoint object which is a simple subclass of a Python dict object. Each Datapoint object contains all of the information available about that particular data point.
>>> d = datapoints[0]
>>> d
{u'Average': 0.0,
u'Samples': 1.0,
u'Timestamp': u'2009-05-21T19:55:00Z',
u'Unit': u'Percent'}
My server obviously isn't very busy right now!
That gives you a quick look at the CloudWatch service and how to access the service in boto. These features are still under development and feedback is welcome so give it a try and let me know what you think.
Friday, May 8, 2009
Cloud Computing Hierarchy of Needs

With apologies to Abraham Maslow and his hierarchy of human needs, a somewhat tongue-in-cheek variation applied to the brave new world of Cloud Computing.

Cloud Computing Hierarchy of Needs by Mitch Garnaat is licensed under a Creative Commons Attribution-Share Alike 3.0 United States License.
Subscribe to:
Posts (Atom)